Now a days BLUESTACK is very popular , many users enjoying android apps on PC, but some are facing problem related to installing another version of bluestack after UNISTALLING bluestack. some errors shows by bluestack, these errors come because of the uncomplete uninstall of software. Here is the guide to unistalling bluestack completely .
Step 1: Uninstall BlueStacks from Control Panel as we uninstall other programs. So Open Control Panel.
Then navigate to : Control Panel\Programs\Programs and features and Select BlueStacks and click uninstall and follow the on screen options to uninstall BlueStacks.
Step 2: Delete the remaining folder from C Drive manually. For this go to C:\ProgramData(Note: The folder will be hidden so unhide the folders).
Delete BlueStacksSetup folder from there.
Delete all Bluestack registry from Registry Editor.
Open registry editor from RUN by pressing WINDOWS+R
Search bluestack registry by pressing CTR+F.
type BLUESTACK then hit ENTER.
what you find in result just delete that
Say bye to slow speed of your machine, modify your device for boosting your device these steps and applications will help you to maxmize performane .
Here is a list given of softwares, you should try -
PHOTO VIEWER & EDITOR
Picasa
Autodesk pixler [Store app]
AUDIO-VIDEO PLAYER VLC media player ANTIVIRUS 360 Total security SYSTEM BOOSTER Advance system care Ultimate APPLICATION UNINSTALLER Iobit unistaller ANDROID EMULATER Bluestack app player Browser Google chrome DOWNLOAD MANAGER Internet download manager OFFICE WORK Microsoft office 2013 DRIVER UPDATER driver booster beta version RAR & ZIP opner Winrar.
WINDOWS STORE APPS
facebook
official messenger by Facebook
autodesk pixler
hinkhoj
sway
flipkart
myntra
Cricbuzz
google
After this You can set base of a system . Intall microsoft netframe work service pacakge.
SYSTEM REQUIREMENT :
operating system : microsoft windows Vista/xp/7/8/8.1/10 [store apps only for win 8/8.1/10]
processor : intel pentium or higher
ram : 2GB or higher [recommondaed 4 GB]
storage space : 20 GB
Soon this article will be update with download link.
Get the premium version of Facebook social toolkit premium for free to access the cool features for Facebook.
Facebook Social Toolkit Premium Version for Free
Facebook Social Toolkit Chrome Extension Comes with Some Free Features, and some of the features are Paid. So we have Given Download Link Premium Version of Facebook Social Toolkit, Which you can Install in your Google Chrome Browser, and you will be able to Run Premium Features of this Extension for Free without Paying anything. If you want to do various tasks in Facebook, Then you can check out Facebook Social Toolkit in your Pc, with Firefox or Chrome Extension. This is the one of the most advance, and best toolkit, for Facebook which is available these days. We have Shared premium version of This Tool, so you can enjoy Latest and Cool features of Facebook, with the help of this Extension.
On July 29, 2015, A new windows pro version launched that was windows 10 , after a year Microsoft releases its windows 10-anniversary update . so just take a look .
How to get the Anniversary Update using the Media Creation Tool
Alternatively, you can use the Media Creation Tool to perform an in-place upgrade or a clean installation of the operating system with the Anniversary Update. However, Microsoft often delays the availability of new versions through different methods for the sake of stability of the servers. As such, it could take a little bit of time until you can use this method to upgrade your computer.
Once the Windows 10 Anniversary Update is available you can use the following steps to upgrade:
Double-click the MediaCreationTool.exe to launch the tool. Follow the steps until you get to Windows 10 Setup.
Select Upgrade this PC now.
Click Next.
Once the download completes, click Accept to agree to the terms.
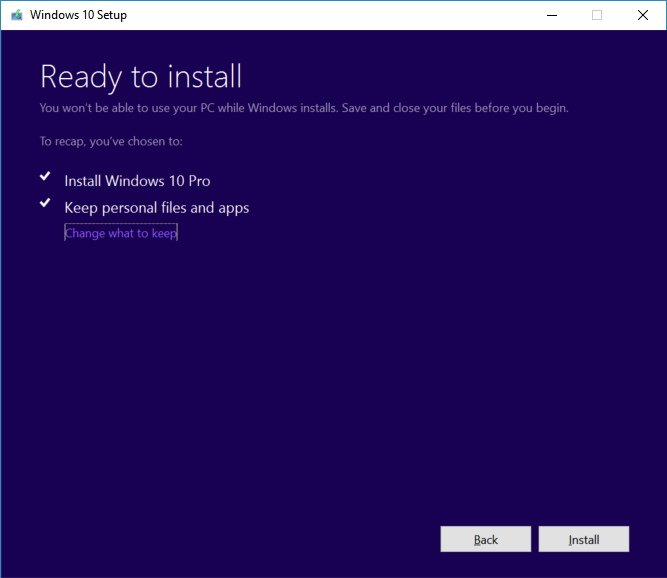
Make sure the installer is set to Keep personal files and apps, which should be the default behavior. (If it's not, click the Change what to keep link to change the settings.)
Click the Install button to begin the update process.
At this point, the Windows 10 setup will start the installation of the Anniversary Update on your device preserving your files and apps. The upgrade process can take some time depending on your internet speeds, hardware, and other factors, but from the most part, it shouldn't take longer than 30 minutes.
How to get the Anniversary Update if you're in Insider program
If your computer or phone is enrolled in the Windows Insider Program, and you're running Windows 10 build 14393.x or later, you're already running the Windows 10 Anniversary Update, and you don't need to do anything else.
If you want to stay in the stable version of the operating system, you'll want to opt out of the Insider Program. Here's how:
Open Settings.
Click on Update & security.
Click on Windows Insider Program.
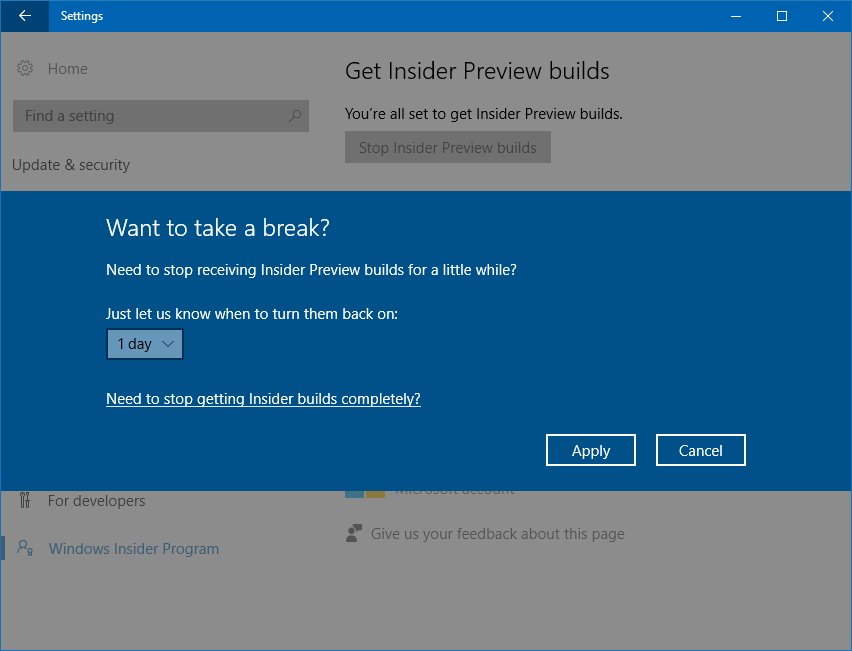
Click the Stop Insider Preview builds button.
Click the Need to stop getting Insider builds completely? link.
Click the Confirm button.
Click the Restart Now button to complete the process.
Now your device will no longer be enrolled in the Insider program, and you'll be able to keep the same installation intact.
Get It. .. . . ..
Here is a way by which you can create your own Hotspot on PC.
Here is the way to download streaming videos without any downloader, all you need to just copy and paste the link of the particular video .
For downloading videos click on this link : KEEPVID
Just copy the link of the videos and copy click on download . .
KeepVid Video Downloader is a free web application that allows you to download videos from sites like YouTube, Facebook, Twitch.Tv, Vimeo, Dailymotion and many more. All you need is the URL of the page that has the video you want to download. Enter it in the textbox above and simply click 'Download'. KeepVid will then fetch download links in all possible formats that the particular site provides.
YOU FINISHED !!! if not comment below ...
These days many students are facing the problem of not understanding . Here by some taps, You can customize yourself with E-learning .
NCERT Solutions, Sample Papers, Extra Question, Study Materials, Notes, PSA, Question papers and solution for Class 8th, 9th, 10th, 11th, and 12th.CBSE Test Papers, Sample Papers, Syllabus, Last Year Papers for Class 9,10,11,12 and Subjects English, Maths, Science, Physics, Chemistry, Mathematics, ...So On ...
Today , I meet a guy with a problem of unable to delete that old partition in which he had installed old windows . So if u also stuck here then check this Out :
Click on start , Search "CMD" run CMD "AS ADMINSTARTION"
when Command prompt open Type "DISKPART" then hit ENTER.
Then type "LIST DISK" as shown in the screenshot and hit enter .
Now type "SELECT DISK 0" , NOTE : your disk number must be 0 nothing else keep it in mind .
Now type "LIST PARTITION" then hit enter .
After this type "SELECT PARTITION 1" please careful in slecting number of the drive . replace "1" by the number of partition which you wants to format .
Final step type "CLEAN" then hit ENTER .
You finished !!
BlueStacks
BlueStacks App Player Pro is a platform that allows you to run applications, including games written for OS Android – on desktops, laptops and tablets and also this package contains all files to install it offline. This is a special program that uses a technology called LayerCake, which provides the correct environment for running applications for ARM-Android on a computer running Windows. Get Root (right super – user).
After you install BlueStacks on your Windows PC, you can download directly from the program needed Android-app, without having to use the Android-based smartphone. BlueStacks looks pretty neat and fits naturally into the interface Windows.
Features List
Run Android applications in full-screen and not only.
Through the cloud download your application from the phone to Windows.
In 16 player preinstalled applications and you can play them if there is no number.
Ability to set an unlimited number of applications.
Ability to play 3D games (cache).
You can set a home screen (Launcher) to replace the standard, etc.
Sync with your Android device will allow you to make calls, send SMS, take pictures and more.
Has a lot of settings and system settings Android (Although they are slightly trimmed)
Knows how to install applications from a computer at the touch of them
Ability to obtain Root (full access to the file system, etc.)
You can set Google Play, simply speaking market.
BlueStacks great friends with ADB is a very big plus, if you really want, you can change the firmware.
Ability to turn in FastBoot and Recovery.
BluesStacks has virtual disk, such as SD Card, Data, and a few others. Which again gives you the opportunity to do a lot of “body” motions with it and enjoy all its charms.
Ability to obtain Root (full access to the file system)
Mod Info
Simple Launcher Interface
SuperUser Support
SuperSu Support
Import Windows Files directly from your PC to bluestacks
Root Explorer Support
Advanced Calculator Support
Clock, Camera, and other accessories support
Root Checker Support
Build in Media Player which run mp3, mp4 and many other formats easily
Many more…
Requirements
To run 3D games need support virtualization technology Intel® VT-x or AMD-V ™
To install the BlueStacks need a video card that supports OpenGL 2.0 or later
To start BlueStacks need about 1GB of RAM, otherwise you run the risk of “infinite loading”.
For optimum performance, BlueStacks is highly desirable to update your graphics card drivers
NVIDIA – (WHQL – certified, stable drivers. Beta – unstable, but can increase in speed)
Windows Repair (by Tweaking.com) is a compact instrument that fixes most of Windows problems, such as registry errors, file permissions or problems with Windows Update, Windows Firewall, Internet Explorer, and more.
As we know POKEMON GO game suddenly rises . this is also a good gift for the gamers, By seeing the preference of people some of the things related to Pokemon Go check it out this will really helpful .
Pokémon Go
Pokémon Go is a free-to-play location-based augmented reality mobile game developed by Niantic and published by The Pokémon Company as part of the Pokémon franchise. It was released worldwide in July 2016 for iOS and Android devices.
The game allows players to capture, battle, and train virtual Pokémon who appear throughout the real world. It makes use of GPS and the camera of compatible devices. Although the game is free-to-play, it supports in-app purchases of additional gameplay items. An optional companion Bluetooth wearable device, the Pokémon Go Plus, is planned for future release and will alert users when Pokémon are nearby.
How To Hack ?
Download and Extract the hack archive from the links below
Open the hack.txt file and follow the steps
The Hack archive contains 3 Hacks + Anti-Ban
Screenshots
Changelog
(15/07/16) – Initial Release
(21/0716) – Search feature added
(24/07/16) – A lot of new features + Real time Pokemon map added ( No trainer club account is needed. Enjoy )
These days many people suffering with the problem of rooting andoid device, so here we are presenting a latest or you can say it useful trick to Root your android device without any PC . follow these simple steps to root your phone ..
Framaroot
Framaroot is a one click application that roots almost any android phone or device without the need of a Computer . Framaroot was developed by alephzain from The XDA forums . With one click this app can install the Superuser and Su binary on your phone . Framaroot currently supports phones with Android versions from 2.0 to 4.2 . This is one of the easiest and fastest rooting methods .
Steps to root your android phone without a computer
This is another guide by the author to make your windows 8/8.1/10 work smooth and faster . I am seeing many people's troubling with the speed of windows facing hanging problems, late respond etc. by noticing all these problems this blog is for them .
1. Disable programs that run on startup
One reason your Windows 10 PC may feel sluggish is you’ve got too many programs running in the background—programs that you may never use, or only rarely use. Stop them from running, and your PC will run more smoothly.
Start by launching the Task Manager: Press Ctrl-Shift-Esc or right-click the lower-right corner of your screen and select Task Manager. If the Task Manager launches as a compact app with no tabs, click “More details” at the bottom of your screen. The Task Manager will then appear in all of its full-tabbed glory. There’s plenty you can do with it, but we’re going to focus only on killing unnecessary programs that run at startup.
Click the Startup tab. You’ll see a list of the programs and services that launch when you start Windows. Included on the list is each program’s name as well as its publisher, whether it’s enabled to run on startup, and its “Startup impact,” which is how much it slows down Windows 10 when the system starts up.
To stop a program or service from launching at startup, right-click it and select “Disable.” This doesn’t disable the program entirely; it only prevents it from launching at startup—you can always run the application after launch. Also, if you later decide you want it to launch at startup, you can just return to this area of the Task Manager, right-click the application and select “Enable.”
You can use the Task Manager to help get information about programs that launch at startup and disable any you don’t need.
Many of the programs and services that run on startup may be familiar to you, like OneDrive or Evernote Clipper. But you may not recognize many of them. (Anyone who immediately knows what “bzbui.exe” is, please raise your hand. No fair Googling it first.)
The Task Manager helps you get information about unfamiliar programs. Right-click an item and select Properties for more information about it, including its location on your hard disk, whether it has a digital signature, and other information such as the version number, the file size and the last time it was modified.
You can also right-click the item and select “Open file location.” That opens File Explorer and takes it to the folder where the file is located, which may give you another clue about the program’s purpose.
If you’re really nervous about one of the listed applications, you can go to a site run by Reason Software called Should I Block It? and search for the file name. You’ll usually find very solid information about the program or service.
Now that you’ve selected all the programs that you want to disable at startup, the next time you restart your computer, the system will be a lot less concerned with the unnecessary program.
2. Disable shadows, animations and visual effects
Windows 10 has some nice eye candy—shadows, animations and visual effects. On fast, newer PCs, these don’t usually affect system performance. But on slower and older PCs, they can exact a performance hit.
It’s easy to turn them off. In the Windows 10 search box type sysdm.cpl and press Enter. That launches the System Properties dialog box. Click the Advanced tab and click “Settings” in the Performance section. That brings you to the Performance Options dialog box. You’ll see a varied list of animations and special effects.
The Performance Options dialog box lets you turn off effects that might be slowing down Windows 10.
If you have time on your hands and love to tweak, you can turn individual ones on and off. These are the animations and special effects you’ll probably want to turn off, because they have the greatest effect on system performance:
Animate controls and elements inside windows
Animate windows when minimizing and maximizing
Animations in the taskbar
Fade or slide menus into view
Fade or slide ToolTips into view
Fade out menu items after clicking
Show shadows under windows
However, it’s probably a lot easier to just select “Adjust for best performance” at the top of the screen and then click OK. Windows 10 will then turn off the effects that slow down your system.
3. Launch the Windows troubleshooter
Windows 10 has a very useful, little-known tool that can sniff out performance problems and solve them. To launch it, type troubleshooting into the search box, and click the “Troubleshooting Control Panel” icon that appears. Then click “Run maintenance tasks” in the System and Security section of the screen that appears. A screen titled “Troubleshoot and help prevent computer problems” will appear. Click Next.
The troubleshooter will find files and shortcuts you don’t use, identify any performance and other issues on your PC, report them to you and then fix them. Note that you may get a message that says, “Try troubleshooting as an administrator.” If you have administrative rights to the PC, click it and the troubleshooter will launch and do its work.
Windows 10’s troubleshooter can perform maintenance and housecleaning tasks to help speed up your system.
4. Get help from the Performance Monitor
There’s a great tool in Windows 10 called the Performance Monitor that can, among other things, create a detailed performance report about your PC, detail any system and performance issues, and suggest fixes.
To get the report, type perfmon /report into your search box and press Enter. (Make sure there’s a space between “perfmon” and the slash mark.) The Resource and Performance Monitor launches and gathers information about your system. It will say that it will take 60 seconds, but I’ve found that it takes several minutes. When the Monitor finishes, it will launch an interactive report.
The Performance Monitor reports details on system and performance issues.
You’ll find a lot of extremely detailed information in the report, and it can take a lot of time to go through. Your best bet is to first look at the Warnings section, which details the biggest issues (if any) it found on your PC, such as problems with Windows, with drivers and so on. It also tells you how to fix each problem—for example, how to turn on a device that has been disabled.
It is also worthwhile to scroll down to the Resource Overview section, where you’ll find an analysis of how well your CPU, network, disk and memory are performing. Each result is color-coded, with green meaning no problems, yellow meaning potential issues, and red showing a problem.
Beyond that, the Resource Overview also reports performance metrics and explanatory details. For example, for the CPU, it might show green and a utilization of 21%, with the details, “Normal CPU load.” Or for Memory, it might show yellow, with 62% utilization and the details, “1520 MB is available.” Based on what you get, you might want to do something about your hardware—for example, add more memory.
5. Kill bloatware
Sometimes the biggest factor slowing down your PC isn’t Windows 10 itself, but bloatware or adware that takes up CPU and system resources. Adware and bloatware are particularly insidious because they may have been installed by your computer’s manufacturer. You’d be amazed at how much more quickly your Windows 10 PC can run if you get rid of it.
First, run a system scan to find adware and malware. If you’ve already installed a security suite such as Norton Security or McAfee LiveSafe, you can use that. You can also use Windows 10’s built-in anti-malware app—just type Windows Defender in the search box, press Enter, and then click Scan Now. Windows Defender will look for malware and remove any it finds.
It’s a good idea to get a second opinion, though, so consider a free tool like Malwarebytes Anti-Malware. The free version scans for malware and removes what it finds; the paid version offers always-on protection to stop infections in the first place.
Malwarebytes Anti-Malware is a useful application that will scan for and fix Windows 10 PC problems.
Now you can check for bloatware and get rid of it. Several free programs will do this for you.
Speed up internet speed
use google DNS server address this is fantastic this DNS will let you to enjoy high speed .
Configure your network settings to use the IP addresses 8.8.8.8 and 8.8.4.4 as your DNS servers.
If you decide to try Google Public DNS, your client programs will perform all DNS lookups using Google Public DNS.
The first thing we need to do is right-click on the network status notification icon and choose to Open the Network and Sharing Center from the context menu.
Then click on the Change adapter settings hyperlink on the left-hand side of the Network and Sharing Center.
Note: as a quick shortcut to get to this point, you can type ncpa.cpl into the Start Menu’s search or Run box.
Now right-click on the network adapter you wish to change the DNS settings for and select properties from the context menu.
When the properties for your network adapter open, you will need to select Internet Protocol Version 4 (TCP / IPv4) from the list, then click properties.
Our example will have opened the IPv4 settings for your network adapter. You will see in the bottom half of the dialog that your PC is set to get its DNS settings “automatically”. You will need to change that so that we can manually specify the DNS servers we want to use. Now simply choose a service below and enter the DNS server addresses.
Google DNS
Preferred: 8.8.8.8
Alternate: 8.8.4.4
OpenDNS
Preferred: 208.67.222.222
Alternate: 208.67.220.220
We opted to go with Google DNS for now — while they could use this data to track your browsing habits, personally we’re not that worried about it.
That is all there it to it. For more insight into how DNS actually works .
Microsoft Office Files Don’t Open
If you’re trying to open Microsoft Office files and getting errors like “file is corrupt and cannot be opened”, “unable to start correctly”, and “experience an error trying to open the file”, it might be due to problems with the Protected View feature.
To overcome this, press CTRL + X and then select Command Prompt (Admin). Input the following command, but replace the Office number with whatever version you’re using, and then hit ENTER on your keyboard:
You should now be able to open your Office files. If not, try repairing the installation. For this, do a system search for programs and features and select the relevant result. Find Office in the list, right-click it and then press Change. Select Online Repair and then click Repair.
FINISH...
This is how you can make your windows fatser and smoother .
I am just @ 6TEEN. got Addicted to tech, this is my first blog hope all users colud satisfy. Expert in Computer/Phones errors, Web developing, Internet/Websites. PlAyIng trIcks.